

Most websites use web analytics and marketing tools to track and optimize their visitors’ behavior. Most of those tools (Google Analytics, for example) use cookies to identify these visitors. However, in some countries, website owners are required to receive specific authorization from each and every visitor for using cookies or storing personal information – or both. This type of authorization from visitors is usually called “Opting-In”. Moreover, site owners in some countries are allowed to use cookies but must first offer visitors the option to “Opt-Out”, which tells the site not to use cookies or store personal information for visitors who “opt-out”.
Regardless of legal requirements, presenting an opt-out option for your visitors can be considered a transparent, fair service, and will probably strengthen your visitors’ engagement and loyalty.
The idea is to have a default on your site, such as tracking all visitors unless otherwise specified, plus the option for your visitors to specifically “opt-out”, by performing a certain action such as clicking on a link or ticking a checkbox.
One possible way to implement the “opt-out” option is by using JavaScript to disable tracking (either by not sending events or by disabling the service using its built-in support, if available). However, when using JavaScript, even if you don’t fire an event or send a pageview, this doesn’t always mean that the 3rd party vendors won’t actually perform actions such as cookies settings.
The best way to implement the opt-out option is to not place tracking tags on the site. Google Tag Manager (GTM) is designed exactly for these kinds of tasks and will let you define when and where to include the tracking tags – and with almost no coding.
In this post I will show you how to implement opt-in and opt-out links on your site in order to allow your visitors to decide whether or not they agree to be tracked. I will use Google Analytics as an example but this method works with any service that requires placing a tag on your site for means of tracking.
You can see this in action here
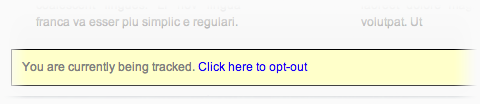
In the above example, the site default is set to track all visitors, but also offer the option of the users opting-out (until they clear the cookies).
Following are the steps for implementing this functionality on your site:
- Create opt-in and opt-out messages and links. In the example, there are two divs and they are located in a fixed position near the bottom of the page.
There is one div for each state:- An opt-in message: “You are currently being tracked” with a link to opt-out
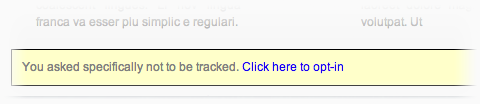
- An opt-out message: “You asked specifically not to be tracked” with a link to opt-in
The links will execute the following javascript command:
[javascript]
<a href=’javascript:dataLayer.push({"event":"optin"});’>Opt in</a>
<a href=’javascript:dataLayer.push({"event":"optout"});’>Opt out</a>
[/javascript]I will explain why we do so in a second, but in general, the above commands will fire an event that can be caught by GTM.
- An opt-in message: “You are currently being tracked” with a link to opt-out
- Create a Show-and-Hide JavaScript function for the two messages. For example, show_opt_out() that will hide the opt-in message and show the opt-out message, and vice versa. These functions will be called on later by GTM.
- Place the GTM code on your webpages immediately after the <body> tag.
If you want to enable your users to opt-out and opt-in for a complete session, or as long as the users do not clear their cookies, add the code described in my previous post before the GTM code.That’s it, no more coding to do. Now all of work is through the GTM Admin Console:
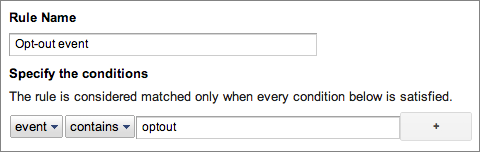
- We now need to catch the opt-in and opt-out events that are fired by the links created in step 1. Catching events assigned to the dataLayer object can be done by creating a rule which will be used by the tag. So let’s create two rules in the GTM and set the condition to “event” equals “optin” for one of them:

and “event” equals “optout” for the other one:
- We may want to remember the user’s choice to opt-in or opt-out during his/her visit and maybe even for his/her next visits – and we can do so by storing this information in a cookie. However, since storing information in a cookie requires the user’s consent in some countries, we will deal with this in the message shown to the users when they click to opt-out. It may read something like “Click here to opt-out. Please note that we will have to use a cookie in order to remember your choice next time you view a page on our site”.
In order to store their choice (until they erase these cookies), we will create a tag for each event and use the dataLayer wrapper (as described in my previous post).
This means that we will have two tags: “Set opt in tracking” and “Set opt out tracking”, and each one will be fired for the rules created in step 4 (“opt-in event” and “opt-out event” respectively).
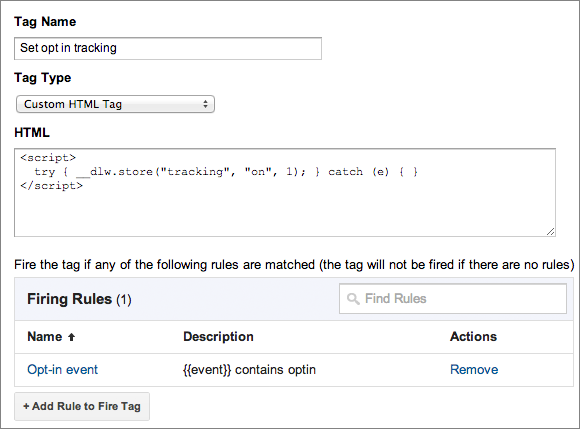
Screenshot of the “Set opt-in tracking” tag definition. - So we now have a dataLayer variable called “tracking” with the value of either “on” or “off”, and can create two new rules:
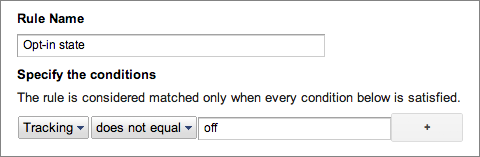
- “Opt-in state”
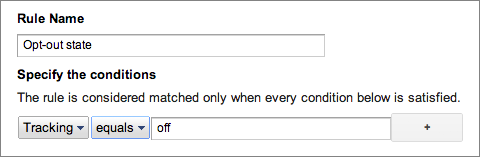
- “Opt-out state”
These will be used to trigger the analytics’ tag (as long as the “Opt-in state” rule is active) and to show the relevant div created in step 1. First we have to create a macro in order to be able to set a rule based on the “tracking” variable:
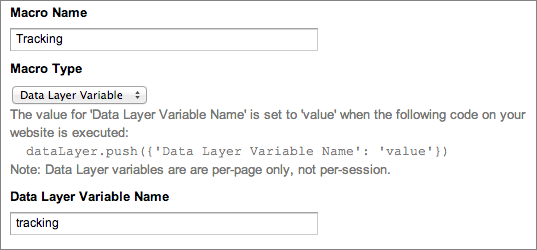
Once you have this “tracking” macro you can go ahead and create the rules. Don’t forget that the “tracking” variable might not hold any value – if the user did not click on either of the links.
Now it is the time to decide on the default tracking behavior on your site. If you wish it to track users, then create:- The “Opt-in state” with the “Tracking” does not equal to “off” condition
- The “Opt-out state” with the “Tracking” equals to “off” condition
If you prefer to do it the other way around – then define as follows:
- The “Opt-in state” with the “Tracking” equal to “on” condition
- The “Opt-out state” with the “Tracking” does not equal to “on” condition
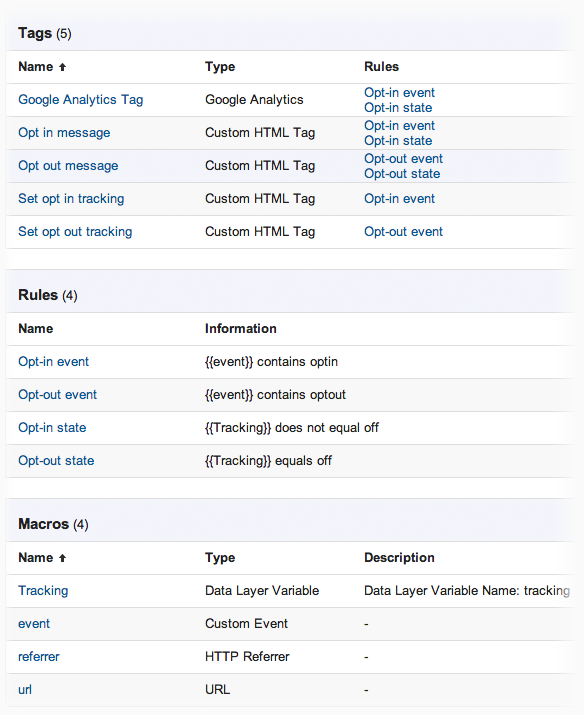
- At this stage, we should have 4 rules (as seen in screenshot below):
 Plus 2 tags (as seen in screenshot below):
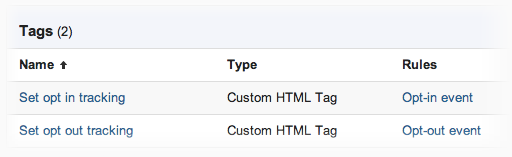 Next thing we have to do is show the correct div, based on the user’s current state. To do so, simply create two custom HTML tags:
- With the “Opt-in message, call the function that is responsible for showing the opt-in message (created in step 2) and use two rules to trigger that tag: “Opt-in event” and “Opt-in state”.
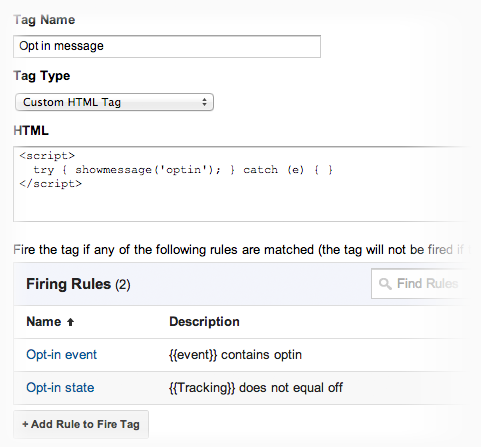
- With the second tag, “Opt-out message”, call the function that is responsible for showing the opt-out message and use the other two rules to trigger it: “Opt-out event” and “Opt-out state”.
- With the “Opt-in message, call the function that is responsible for showing the opt-in message (created in step 2) and use two rules to trigger that tag: “Opt-in event” and “Opt-in state”.
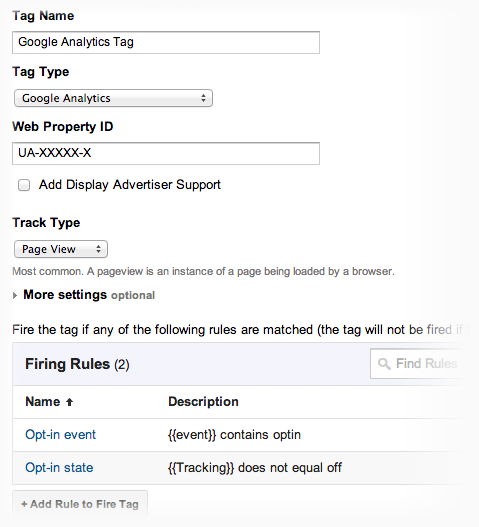
- Last thing we have to do is the analytics’ tag. In this example we will use a Google Analytics’ tag but you can use any other tag (or even multiple tags). In the rules to trigger the tag, use the “Opt-in event” and the “Opt-in state” rules, which will assure you that this tag will only be added to the page if the user is in the “Opt-in state”.
That’s it. It might look difficult but once you catch on to the idea, it actually makes a lot of sense:
The user can be in one of two states, either “Opt-in” or “Opt-out”, and the actual tracking tag (Google Analytics Tag in the above example) is only added if the user is in the “Opt-in” state.
In total, you should have 4 tags, 5 rules and 4 macros (3 default ones and the “Tracking” macro we’ve created) as follows:
If you have any questions or suggestions, please contact me or leave me a comment.
FAQs about Using Google Tag Manager to Enable Visitors to Opt-Out of Being Tracked
What is Google opt-out?
Google’s opt-out feature allows users to prevent their data from being collected and tracked by Google services, such as Google Analytics. For instance, Google offers a browser add-on that lets users opt out of being tracked by Analytics across websites.
What is an example of opt-out?
Opt-out options are commonly provided by companies to give users control over their data. For example, users may unsubscribe from newsletters, reject cookies, or untick a box that saves their personal details. A common example is an “unsubscribe” link at the bottom of marketing emails.
What are the benefits of opting out?
The primary benefit of opting out is that it gives users more control over their privacy. It helps them avoid unwanted tracking and communication, ensuring that they only share the information they choose to.
Can users opt out of Google Analytics tracking?
Yes, users can prevent Google Analytics from tracking their data by using Google’s official browser extension called the Google Analytics Opt-out Add-on. This stops data from being sent to Google Analytics from their browser.
How do you stop Google Analytics from tracking your own visits?
To prevent Google Analytics from tracking your own visits to your website, you can install a Chrome extension like “Block Yourself from Analytics.” This tool ensures that your personal website visits are excluded from being tracked.


 Follow @cardiolog